
1.Introduction
Immersive Audio (IMAU) Premium Surround is an up-mixing algorithm that converts a 2-channel input signal to an 8-channel output signal to improve spaciousness and immersiveness experience.
Objectives:
- Producing a natural, artifact-free sound.
- Low MIPS and memory consumption.
- Flexible design.
2.Signal Flow Description

Output Layout
IMAU Premium Surround outputs 8-channel audio signal which shall be routed to the system loudspeakers as depicted in the following table:
| Channel No | Output |
| 1 | Left Front Speaker |
| 2 | Right Front Speaker |
| 3 | Center Speaker |
| 4 | Sub-Woofer Speaker |
| 5 | Left Side Speaker |
| 6 | Right Side Speaker |
| 7 | Left Rear Speaker |
| 8 | Right Rear Speaker |
Main Processing Blocks
IMAU Premium Surround is built with several processing blocks:
- Spectral Manager: splits the source signal into 2 bands (Low Band and High Band)
- Center Extraction: extracts two sound components from the native stereo signal (Extracted Center, Residuals Left and Right)
- Ambience: generates early reflection and reverb to simulate room acoustics effects
- Mixing and Routing: mixes all the generated signals to create an immersive sound field.
3.Tuning Panel
The tuning panel is arranged in two sections.
- The section on the left-hand side hosts 4 tabs. Each tab is dedicated to control and tune a specific feature or group of features, as per the following arrangement:
- SPECTRAL MANAGER
- SPREAD
- AMBIENCE
- SUPERUSER
- The section on the right-hand side is called Master Control and is reserved to adjust several master functions.
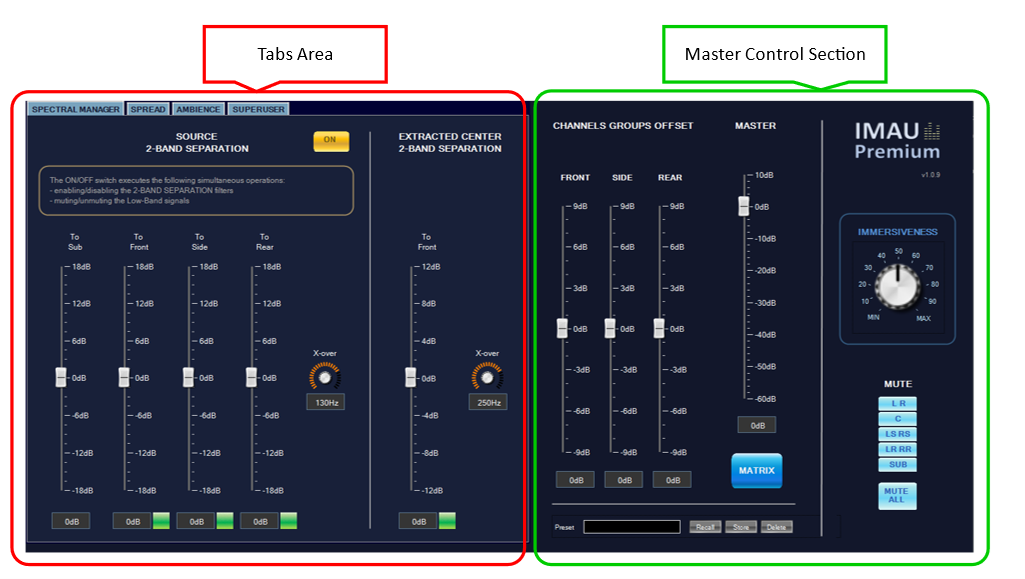
The Master Control Section remains always visible and accessible, while the other features can be accessed individually via the corresponding tab.
Spectral Manager
IMAU Premium Surround integrates a 2-bands Spectral Manager designed to ensure that the whole audio spectrum is optimally reproduced in the car.
Spectral Manager takes the full-band stereo input signal and splits it into the following 2 bands:
- Low Band (in the range 40-200 Hz)
- High Band (from minimum 40-200 Hz to half of the sampling rate)
The Spectral Manager is also complemented by the Extracted Center Band Split functionality where the High Band of the Center channel is further split into two bands by a crossover filter. The lower frequency component is routed to the Front channels and the higher frequency component is routed to the Center channel.
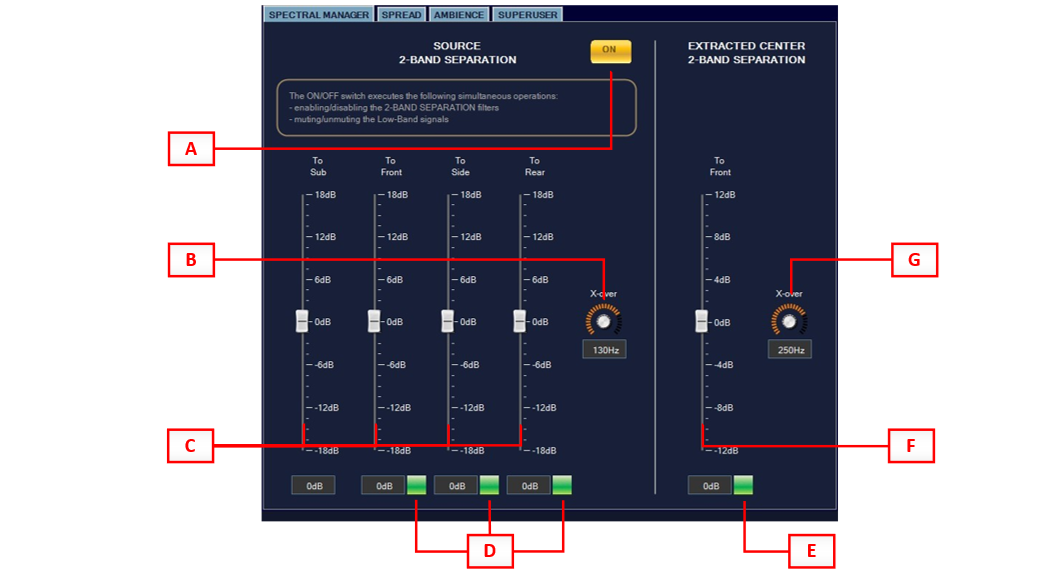
IMAU Premium Surround SPECTRAL MANAGER tab
In the SPECTRAL MANAGER tab, users can control the Equalizers and the Gains AOs integrated in IMAU Premium Surround.
Specifically, they can:
- Enable/disable 2-Band Separation (A)
- Set the crossover frequency of the high-pass and low-pass filters used to generate the band-limited signals (B),
- Set the gain for each Low Band signal (C),
- Independently mute/unmute each Low Band signal (D),
- Enable/disable the gain applied to the lower frequency Center component (E),
- Set the gain for the lower frequency center component (F),
- Set the crossover frequency for the high-pass and low-pass filters used to generate the higher and lower frequency Center components (G).
Spread
One of the main features implemented in IMAU Premium Surround consists in separating the stereo source signal into two components, namely Extracted Center (A) and Residuals (B).
Extracted Center is a 1-channel signal generated from the Left and Right stereo signals having same frequency, energy, and phase.
Residuals is the 2-channel signal remaining after removing the Extracted Center from the stereo source.
The SPREAD tab exposes the parameters to control how these components are processed and routed to the 7.1 output.
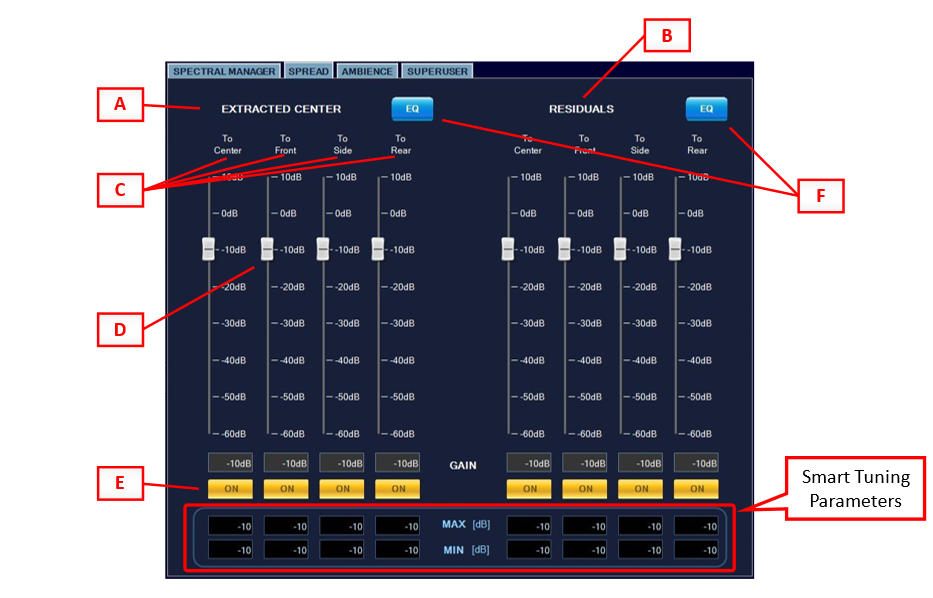
IMAU Premium Surround SPREAD tab
Once Extracted Center and Residuals signals are generated, they are split into multiple copies. Each copy is independently routed to a specific loudspeaker (or loudspeakers pair) to create the immersive sound field, as per the following grouping (C):
- To Center (Center ch.)
- To Front (Left and Right Front ch.)
- To Side (Left and Right Side ch.)
- To Rear (Left and Right Rear ch.)
Static gain can be applied to each signal’s copy via vertical faders (D). These signals can also be independently muted and unmuted (E).
Each signal is further processed by a 2-Biquad filter. Via the EQ buttons (F), users can launch the Native Panels of those filters and configure their tuning (F).
The lower area of the SPREAD tab hosts several fields for configuring the Spread ranges of the Smart Tuning Parameters logic
Ambience
In IMAU Premium Surround, the immersive sound field creation is enhanced by additional signals generated to increase the spaciousness perception. This effect is produced by the signal flow belonging to the AMBIENCE section. It includes two processing blocks, namely, Early Reflections (A) and Reverb (B). The input to the AMBIENCE processing section is the High Band signal of the native stereo input, as generated by Spectral Manager.
The AMBIENCE tab exposes some of the parameters controlling Early Reflections and Reverb, including:
- Vertical faders, to set the global (C) and the separate (D) gains of the signals routed to Side and Rear channels (ch.1&2 are routed to the Side channels and ch.3&4 to the Rear channels),
- ON/OFF switches, to enable/disable AMBIENCE signals generation (E) or to mute/unmute individual channels (F).
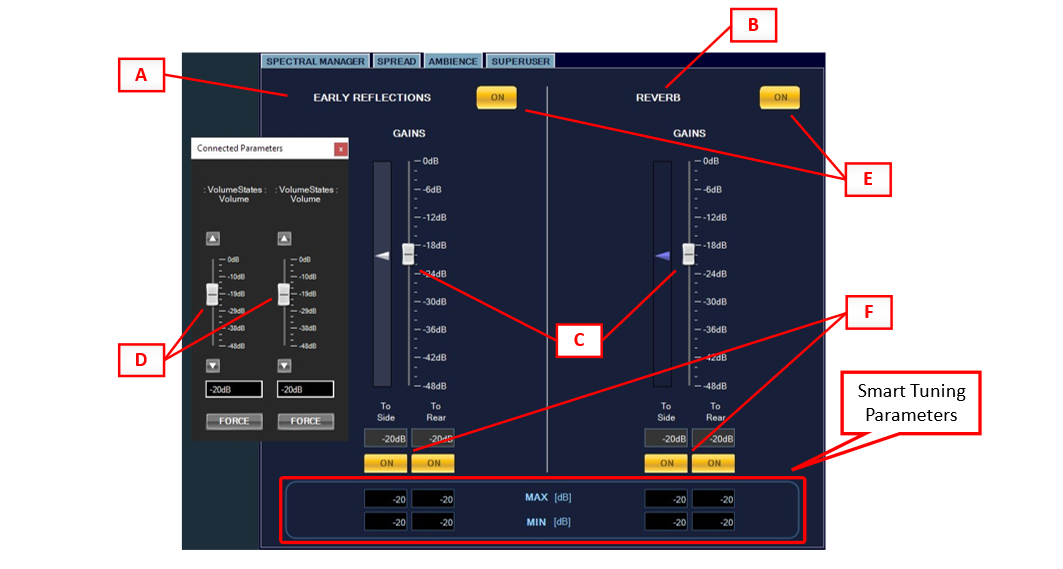
IMAU Premium Surround AMBIENCE tab
The lower area of the AMBIENCE tab hosts the fields for configuring the Spread ranges of the Smart Tuning Parameters logic
Superuser
The fourth tab is called SUPERUSER and exposes controls of the following processing functions.
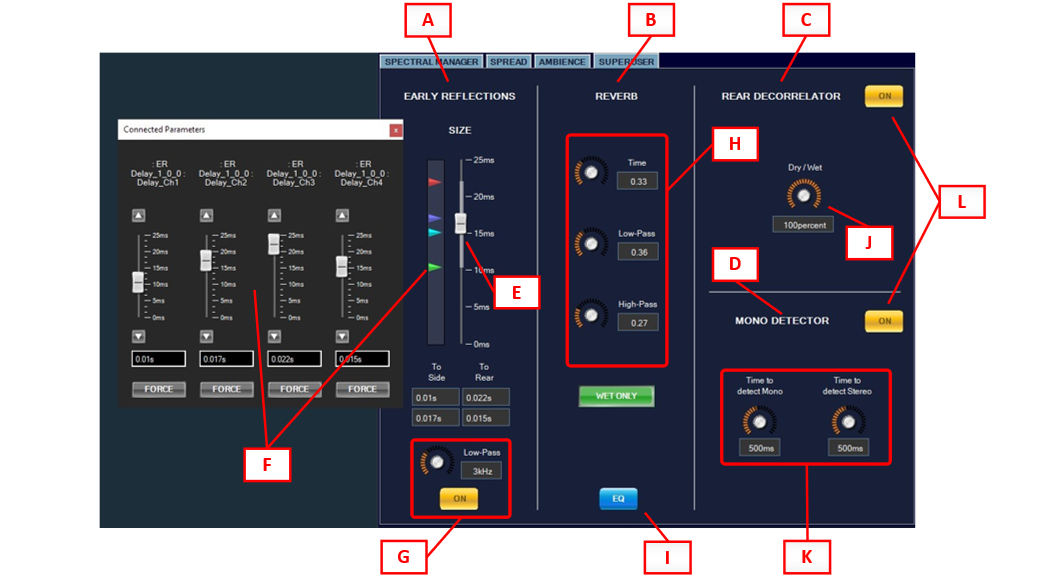
IMAU Premium Surround SUPERUSER tab
|
IMPORTANT NOTE The following parameters should be tuned carefully. In particular, the ambience effect (reverb and early reflections) should be used very subtly. The goal is that the listener does not perceive an additional room (i.e., long reverberation, resonances, changed timbre) but rather that additional reflections expand the perceived spatiality in a neutral way. It is therefore recommended to make the reverb short (Time) and narrow band (Low-Pass and High-Pass) as shown in the screenshot |
EARLY REFLECTIONS (A):
- Vertical faders for setting the delay size of the Early Reflections signals, globally (E) and individually (F),
- Cut-off frequency and ON/OFF switch of the Low-Pass Filter applied to the Early Reflections output signals (G)
REVERB (B):
- Time: affects feedback damping and output mixing so that a small RT factor resembles a small room, and a large factor approaches infinite reverb time
- Low-Pass: defines the amount of high frequencies of the reverb by means of first-order low-pass filter
- High-Pass: defines the amount of low frequencies of the reverb by means of first-order high-pass filter
- WET ONLY: When switched on, only the generated reverb is present at the output. When switched off, the input signal is mixed into the output.
- EQ: button to launch the Native Panel of the equalizer applied to the Reverb output signals (I)
REAR DECORRELATOR (C):
- ON/OFF switch of the Rear Decorrelator function (L)
- Dry / Wet: defines the percentage of the maximum decorrelation that the decorrelation IRs can achieve (0: minimum decorrelation and coloration, 100: maximum decorrelation and coloration) (J)
MONO DETECTOR (D):
- ON/OFF switch of Mono Detector function (L)
- Time to detect Mono: defines the time ramp for transitioning from stereo to mono
- Time to detect Stereo: defines the time ramp for transitioning from mono to stereo
Please note that, as depicted in the block diagram of Figure 1, the Decorrelation AO has 2-channel input and 2-channel output. For each channel leg separately, the input signal is created summing the following components:
- Residuals 1 and channel 2,
- Early Reflections output channel 3 and channel 4
- Reverb output channel 1 and channel 2
The 2-channel output of the Decorrelator is routed to the Rear loudspeakers.
Master Control Section
The Master Control Section exposes controls for:
- Defining offset gains for Front (Left, Right, Center), Side (Left, Right) and Rear (Left, Right) channels groups (A),
- Setting global output Master Level (B),
- Shaping the output 7.1 signal based on the Smart Tuning Parameters ranges configured in Spread and Ambience (C),
- Muting output channel or channels groups (D),
- Launching the Native Panel of the Matrix Mixer AO integrated in IMAU for routing to the 7.1 output channels all signals generated during the upmixing process (E),
- Recalling, storing and deleting presets (F).

IMAU Premium Surround Master Control section
Smart Tuning Parameters (STP)
IMAU Premium Surround integrates a method for allowing seamless transitioning between two presets. This approach is called Smart Tuning Parameters (STP) and is realized via a signal flow based on LUT controlled via custom Control ID called Immersiveness. The Immersiveness Control ID is exposed to the Custom Panel in the Master Control Section.
It ranges from MIN and MAX values. The actual MIN and MAX values are defined in the SPREAD and AMBIENCE tabs.
|
IMPORTANT NOTE The Smart Tuning Parameters logic applies only to the STP parameters: – Gains of Extracted Center and Residuals signals (SPREAD tab) – Gains of Early Reflections and Reverb signals (AMBIENCE tab) No other parameters are affected by the Immersiveness knob setting (non-STP parameters). |
Configuring STP
The following procedure shall be executed to properly configure the STP tuning.
- Tune the non-STP to obtain an average immersive sound field,
- Set Immersiveness to MIN,
- Tune the STP to obtain a minimum immersive audio output,
- Manually type in the values of the STP into the corresponding MIN fields in the SPREAD and AMBIENCE tabs,
- Set Immersiveness to MAX,
- Tune the STP to obtain a maximum immersive audio output,
- Manually type in the values of the STP into the corresponding MAX fields in the SPREAD and AMBIENCE tabs,
- Use the Immersiveness knob to seamlessly move between the minimum and the maximum immersive output,
- Amend the non-STP to optimize the result for any Immersiveness
|
IMPORTANT NOTE It should be noted that the values in STP sliders need not always correspond to the actual values being applied. This is because the actual values (which can be observed in the state variable of the corresponding AO) depend on the position of the Immersiveness knob and the MIN and the MAX values of STP. The sliders are also not updated with the actual values being set by the Immersiveness knob by design. If needed, STP can be disabled by not sending the control ID information when sending the signal flow. That way the values of the sliders are directly applied to the Volume and Mute AOs. |
4.Operational Guidelines
This section describes some guidelines to help the user operate in the most efficient way for the most effective experience using IMAU Premium Surround.
Instantiating IMAU Premium Surround CAO
To instantiate IMAU Premium Surround CAO in GTT follow these operations:
- in Device Designer, Toolbox, import the .CAO file (e.g.: IMAU Premium 1.0.CAO) (A),
- drag & drop IMAUpremium from the Compound Audio Objects dropdown menu into the signal flow area (B),

Toolbox view
- instantiate a ControlIn AO (C) and configure it to 1 channel outputs (D),
- connect the ControlIn output pin to IMAUpremium Control input pin.
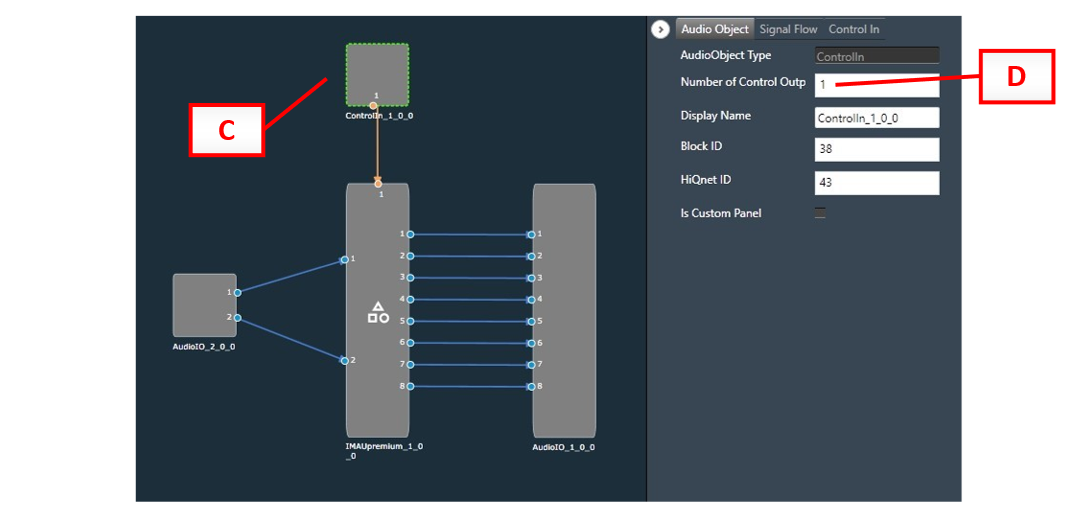
Control Input AO configuration in Device view
- in Device View, press Control IDs (E) and then Import (F),
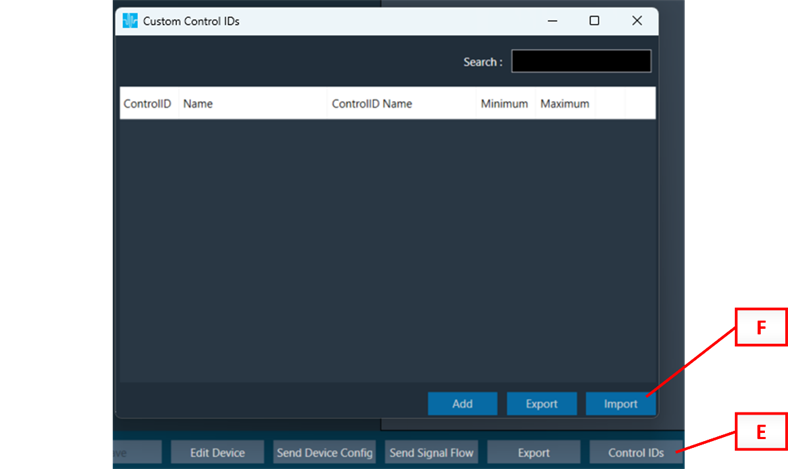
Custom Control IDs
- select the IMAU Premium Control IDs.csv file and import it. The Custom Control IDs popup window will show the following imported Control ID:

Immersiveness added to Custom Control IDs
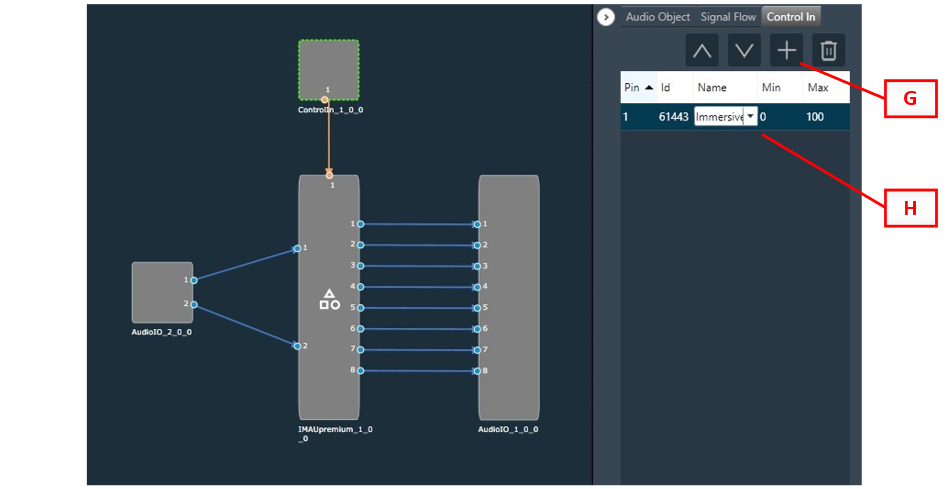
In Device Designer:
- select the ControlID AO and add 1 Control In (G),
- assign Immersiveness to Pin 1 (H),
- Save,
- Edit Device,
- Update Device
Control Input AO set up in Device View
In Device Designer:
- Select IMAUpremium CAO and add CAO Custom Panel to the list (I)
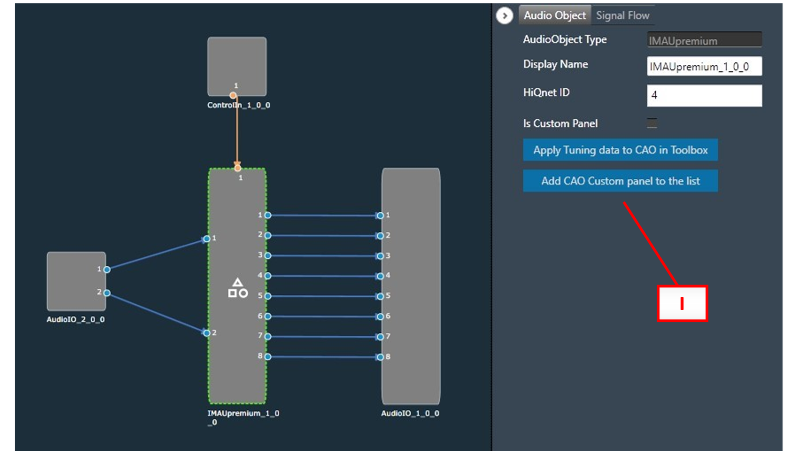
Export Custom panel to panel editor
In Custom Panel:
- Drag&drop the Immersiveness Control ID (J) to link it to the IMMERSIVENESS knob in the Master Control Section of the IMAU Premium Surround panel. Replace the parameter when requested.
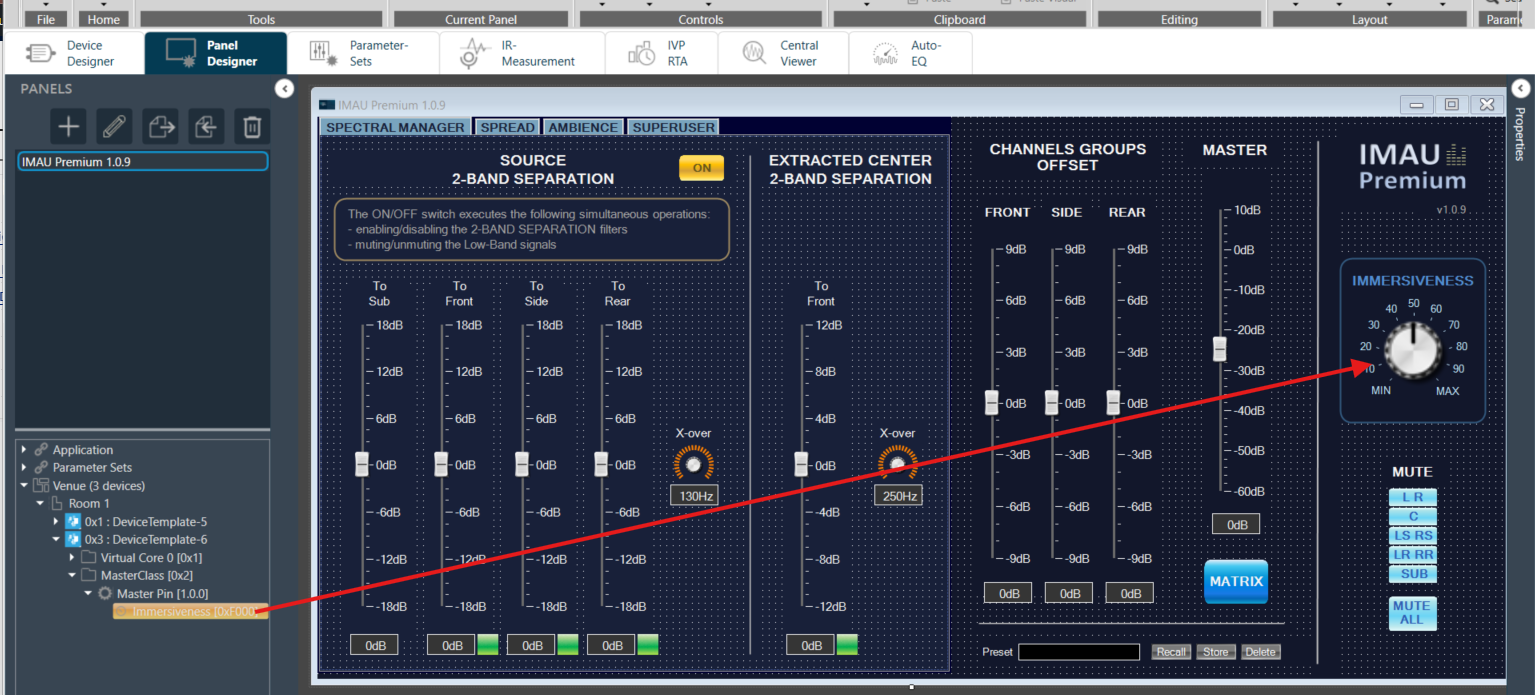
Immersiveness assigned to Custom panel
In Device Designer:
- Select IMAUpremium CAO and tick the Is Custom Panel checkbox (L)
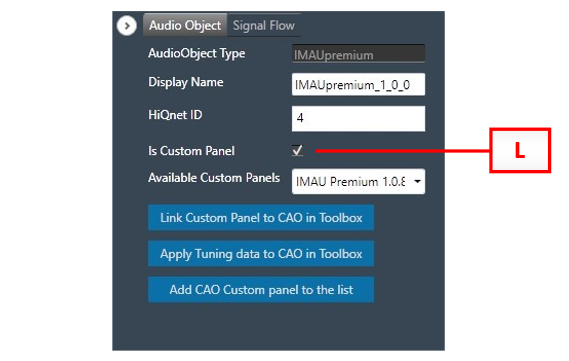
Link Custom panel to CAO
Creating Immersive Sound Fields
The perception of a realistic immersive sound field is enhanced when the localization of sound sources is easier for the listener to identify.
On the other hand, room acoustics cues generated as soundwaves reflected by the environment surrounding the listener help significantly to determine the perception of being immersed in a real ambience.
To improve the effectiveness of the upmixing process it is very important to define a realistic balance between discrete signal distribution and homogeneous ambience acoustic feedback.
Therefore, it is good practice to aim at differentiating the signals reproduced by each loudspeaker (e.g., avoiding routing the same signal and with the same energy to more than one loudspeaker or loudspeakers group) whilst gluing them via an appropriate dose of reflexed sound field as provided by artificial ambience simulations tools like delays and reverberators.
“Front Stage” and “On Stage” Tuning Strategies
With the IMAU Premium Surround approach, different tuning philosophies can be realized. Two well-known ones are “Front Stage” and “On Stage”, which are described below.
“Front Stage”: The goal of this tuning is that the stage (i.e. the musicians, instruments or more generally: the sound events) is in front of the listener and from behind only a natural spatiality is perceived that acoustically matches the sound event on the stage.
Tuning strategy: Clean, stable stage that comes from the front. Side channels are used to carefully insert the residuals to widen the stage slightly. Little residuals from the rears. Overall little energy from side/rear channels.
“On Stage”: With this tuning, the goal is to distribute the laterally placed sound events in the original mix to the sides or rear channels. It creates the impression for the listener that they are on stage.
Tuning strategy: Significantly more residuals from the sides and rear channels. This means that the partially uncorrelated signal components are automatically placed on the side channels (which also contain components of the extracted center signal) and the completely uncorrelated (hard panned) components are placed on the rear channels (which normally should not contain any components of the extracted center signal).