
1.Overview and Scope of this Document
This document describes the procedure to use VST3.X AudioworX Plugin. VST3.x AudioworX Plugin is generated by linking the plugin source code, VST3 SDK, with Win64 xAF Libraries.
2.Folder Structure
To work out of the box, the VST3 AudioworX needs to be organized according to a specific folder structure. Therefore, extract the zip file into an arbitrary workspace folder (e.g. C:\AWX_dev\) and make sure it is matching the structure below and that there are no spaces in the names.
extendable-audio-framework\
external\
inc\ : Folder to place the include files for the External AudioObject.
src\ : Folder to place the source files to build the External AudioObject.
vst3\ : VST3 wrapper files
vstProject\ : Satisfies interface dependencies
Build.bat : Script to build VirtualAmp.dll, required for GTT Toolbox.
Build_VST3.bat : Script to build VST3 plugin.
clean.bat : Script to clean the VST2 build artifacts.
Public\
include\ : xAF HeaderFiles
lib\ : AudioworX libraries for Win32 and Win64
Note: The Steinberg sdk is not part of the AWX package and needs to be downloaded manually. Please refer to option 1 or option 2 mentioned below.
steinbergsdk\
VST3\ (all files and folders inside this folder are part of the Steinberg SDK)
vst3sdk\ : VST3 sdk files and build scripts
There are two options to get the VST3 sdk:
Option 1 (External):
- Download directly from the Steinberg official page [1]:
Note: With the download, you are accepting the license agreement from Steinberg!
- Extract zip file according to above mentioned folder names
Option 2 (Harman internal only):
- git clone ssh://git@bitbucket-munich.harman.com:7999/bitbucket/lsacca/steinbergsdk.git
Note: make sure the branch: “master” is checked out. No need to adjust any folder names
3.Steps to generate VST3.x plugin with external audio object
3.1.Steps to add source code for external audio objects
- Place the source code for the new audio object under external\src\
- Place the header file under external\inc\
- The audio object header file name should be similar to the audio object class name. For example, if the audio object name is CTemplate, the header file name should be Template.h
- Update external\inc\AudioIds.h with the pre-processor macro definition for the new audio object. As shown below

Figure 3 .1 – AudioIds.h - Name of the pre-processor definition should be OBJ_“header file name“. For example if the name of the class is CGain, the header file name should be Gain.h and the pre-processor definition in AudioIds.h should be #define OBJ_GAIN 9002
- Once the steps above are complete, proceed to generate the VST3 plugin following the steps in the next section
3.2.Steps to generate VST3 plugin
- Pre-Requisites:
- Python 2.7
- Cmake version 3.21+, 3.5 confirmed NOT to work
- Microsoft Visual Studio 2017 or later
- Open the command prompt in Administrator mode
- Browse to the external folder
- Run bat to clean up any previous build artifacts
- Run the batch file bat
- Once the build is successful, the library with the external audio object, the VST3 plugin and the corresponding DLL will be copied to the path : public/lib/win64
- The VST3 plugin will also be generated in C:\Program Files\Common Files\VST3
- VST3 Plugin name: vst3,
- If you are building in non-administrator mode, you might see a warning that starts like:

Figure 3. 2 – Warning when opened in Non-Admin mode But this can be ignored. This is a post build script that gets executed after the Plugin and DLL are generated.
- It is recommended not to have long folder names for the build path. CMAKE does not allow the total directory path name to exceed 264 characters
4.Steps to Run VST3 Plugin
VST3 plugins can be run with any tool that is compatible with 64bit VST3 SDK (Examples: Reaper, Bidule, etc.). The two mentioned hosts are tested by the AWX team (Bidule 0.9771, Reaper v6.32). The current VST3 plugin version does not support multi instances, because of an internal hard coding of the socket server port (25001). This port is used by Amp2Srv to communicate with the Harman Global Tuning Tool, when sending the signal flow or tuning the object.
4.1.Bidule
Bidule is a 3rd party host developed by Plogue and can be found here: [2]. This tool supports unequal numbers for input and output channels and can retrieve the configured number of channels automatically. Using the VST3 plugin without a sent signal flow, the plugin will startup with 2 input and 2 output channels. Once you have sent the signal flow and re-added into the patcher of the tool, the number of inputs/outputs will be updated correctly.

4.2.Reaper
This chapter explains the steps to run VST3 AudioworX Plugin in Reaper [3].
- Open the tool, Reaper
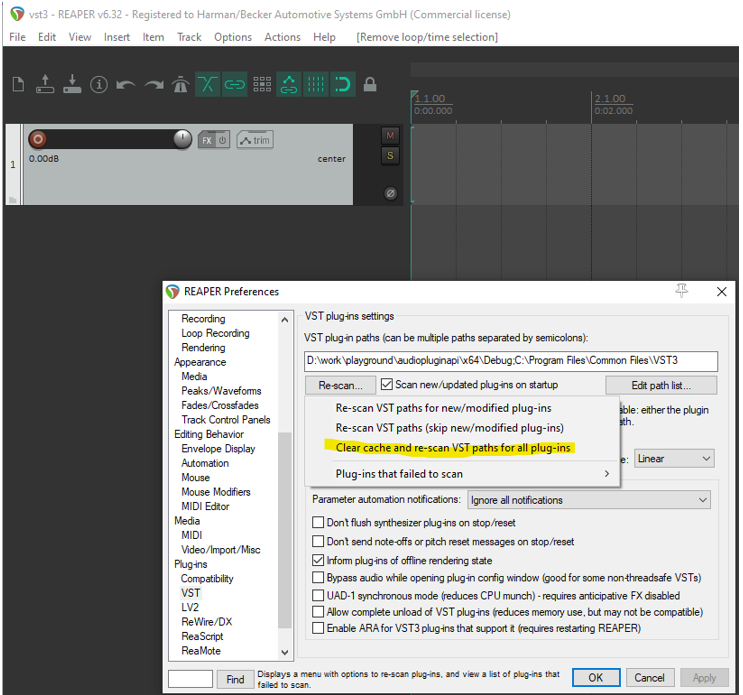
- Go to Optionsà Set the VST Plugin path to C:\Program Files\Common Files\VST3. It can also be set to any custom path where the VST3. AudioworX Plugin, ‘virtualAmpVST3.vst3’ is located

Figure 4.2 – VST Plugin settings - Click on Re-scan, and select clear cache and re-scan
Click on Insert —->New Track to insert a new track (or Press Ctrl + T)
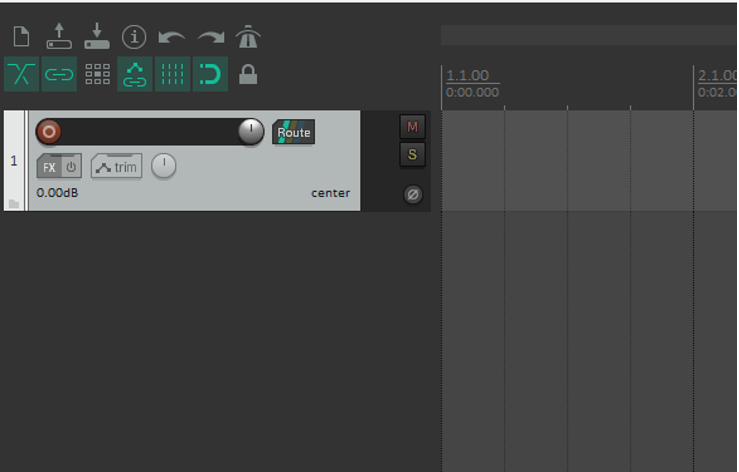
- The Audio configuration is stereo by default in Reaper. To support Multichannel Signal Flows, click on the Route Button in the Track and select the number of channels in the Track channels drop down. This number has to be equal or bigger than the max value from your Device inputs and outputs configured in GTT.
- Example: 3 Inputs, 7 outputs -> Track channels need to be set to 8

Figure 4.5 – Selection to set channel Configuration 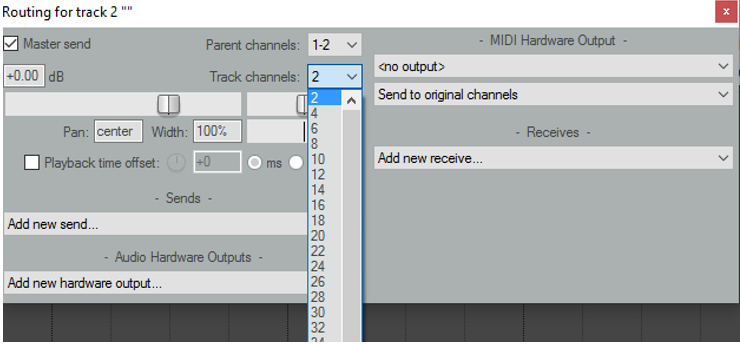
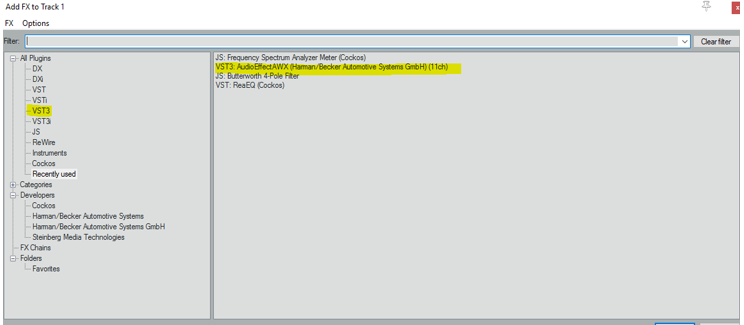
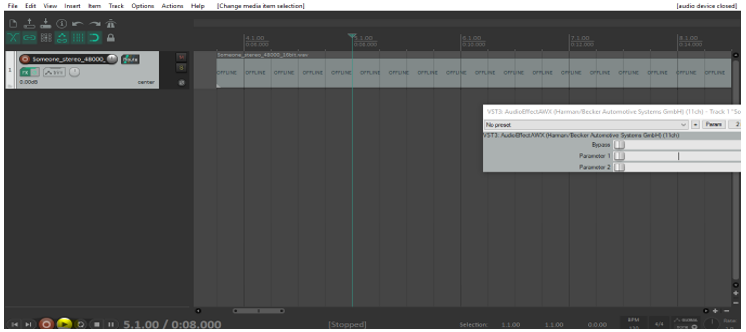
Figure 4.6 – Selecting Number of Channels - Click on the FX Button to add the AudioworX VST 3 Plugin. The plugin can be selected from the tab VST3. Search for the entry AudioEffectAWX
- Example: 3 Inputs, 7 outputs -> Track channels need to be set to 8
If the plugin addition is successful, the default UI for the plugin comes up. You should be able to see:
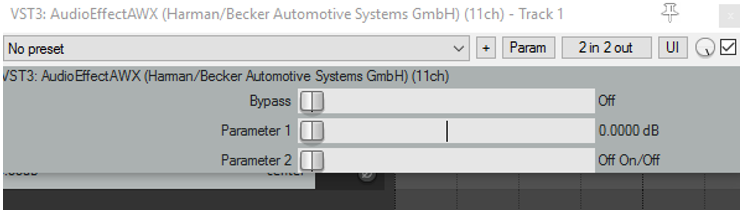
The UI controls for this GUI can be ignored for now. This engineering release drop does not support any GUI
Controls
- Click on Insertà MediaFile to add an audio file to the track
Click on the play button to start audio playback
4.3.GTT
- Use GTT S Release version.
- Load the GTT DLL from /Harman/HarmanAudioworX/AudioFrameworkDLLs/ folder
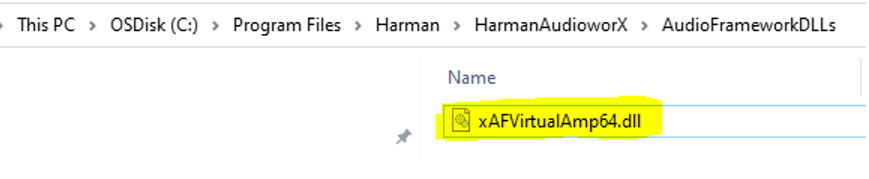
Figure 4.10 – To Select GTT Dll - To connect the device to GTT, open GTT and enter port number 25001 in the AmpSrv settings
- Configure the signal flow as required and click SendSignalFlow to send the signal flow files to the VST3 device
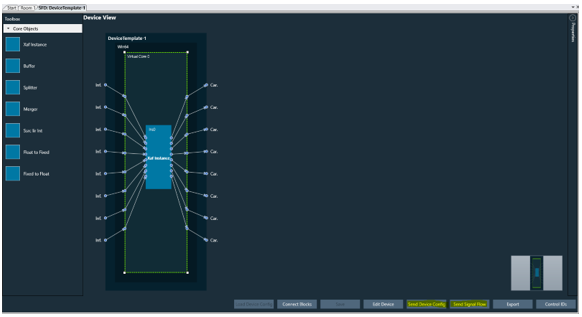
Figure 4.11 – Sending Signal Flow From GTT
5.References
- VST 3 SDK: https://www.steinberg.net/de/developers/
- Bidule: https://www.plogue.com/products/bidule.html
- Reaper: https://www.reaper.fm/